FL Studio
DarkStage follows FL Studio's transport and song position through a controller script over its own dedicated MIDI port pair.
Before you begin: install and launch DarkStage, open DAW Sync, choose FL Studio, confirm DAW Sync is running, and leave DarkStage open while you configure FL. See DAW Setup.
FL Studio setup
FL Studio connects through a DarkStage controller script over its own dedicated MIDI port pair. FL can't send MIDI on its own, so DarkStage asks and FL answers — which is why the Output row is required, not optional.
1. Install the FL Studio MIDI Service
Quit FL Studio first.
Then install the DarkStage FL Studio MIDI Service from DarkStage's DAW Sync settings. It publishes DarkStage's MIDI ports and keeps them available even when DarkStage is closed — which is what stops FL jumping back to the start.
2. Install the DarkStage integration
Install the DarkStage FL Studio Integration from DarkStage's DAW Sync settings. That copies one script file and creates no MIDI device, so it's safe at any time.
3. Open FL's MIDI settings
Start FL Studio and open Options ▸ MIDI settings.
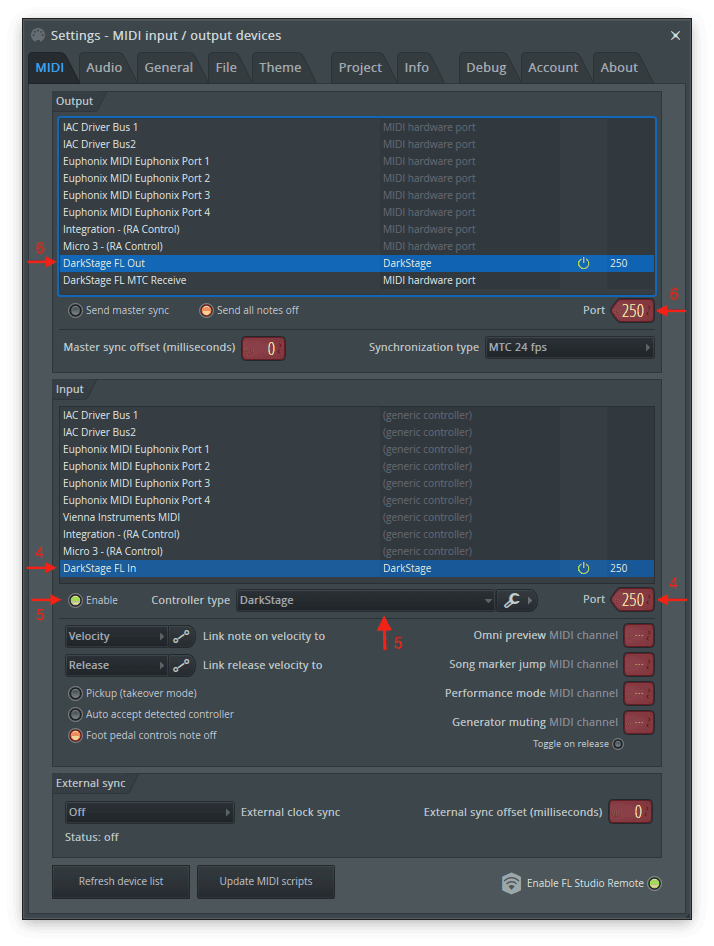
4. Enable the DarkStage input
Under Input, select this port, switch Enable ON, and set Port to 250:
DarkStage FL In
5. Set the controller type
With that row still selected, set Controller type to:
DarkStage
6. Enable the DarkStage output
Under Output, select this port and set its Port to the SAME number, 250. Leave Send master sync OFF:
DarkStage FL Out
7. You're connected
DarkStage follows FL's song position and its Play, Stop and Record state, whether the transport is rolling or parked. Switching FL's counter between its time and musical displays is detected automatically.
Separate SMPTE / MTC setup
The controller script drives the main counter and Play / Stop / Record. MIDI Timecode drives the separate SMPTE widget. They're independent — set up both if you want both.
Leave Send master sync OFF for DarkStage FL Out: that row carries the script's replies, not timecode.
- In FL Studio, switch Options ▸ Enable MIDI master sync ON. Without it FL generates no timecode.
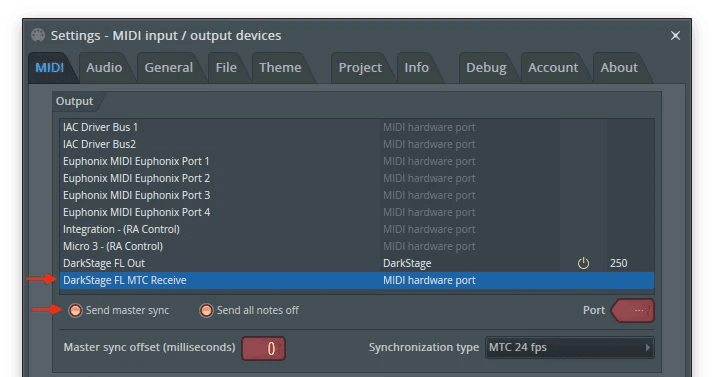
- Open Options ▸ MIDI settings and select DarkStage FL MTC Receive in the Output list. Use THIS port, not DarkStage MTC Receive — the FL one stays available when DarkStage is closed.
- Switch Send master sync ON for THAT row only.
- Set its Synchronization type to MTC, at the frame rate your project uses.
- Leave its Port number as FL sets it — give it a DIFFERENT number from the 250 used above.
- DarkStage's separate SMPTE widget now follows FL Studio.
FL's own counter display
- DarkStage follows FL's time display as Min:Sec, and its bar / step / tick display as Bars + Beats.
- Setting FL's toolbar counter to SMPTE doesn't change the main DarkStage counter — FL reports only whether the panel is showing time or music.
- For SMPTE, use the separate DarkStage SMPTE widget and the MIDI Timecode setup above.
FL Studio troubleshooting
- “DarkStage” missing from FL's Controller type list: install the integration, then quit and restart FL Studio.
- Counter not moving: confirm FL Studio is the selected DAW, and that the Input and Output rows carry the SAME port number — FL pairs them by that number.
- Nothing following: in FL, open View ▸ Script output. “DarkStage FL telemetry v1 ready” means the script loaded.
- FL's playhead jumps to the start when DarkStage launches or quits: the FL Studio MIDI Service isn't installed. Quit FL, install the service, then start FL again.
- Switch Send master sync OFF for every DarkStage row except DarkStage FL MTC Receive.
- Bars + Beats doesn't appear right after first setup: move the FL playhead once. Later launches initialise on their own.
Need more help?
Email support@mydarkstage.com and we'll help you get set up.