WiFi Remotes
Turn an old iPad, a phone or any web browser on your network into a DarkStage display: a record light for the live room, a warning on the studio door, or a bars:beats counter for the string section.
Connect a device
- Click Enable WIFI under the canvas, or turn on Enable DarkStage Remote in Settings ▸ Remotes Manager.
- Click QR Connect. On the iPad or phone, scan the QR code, or type the address shown into Safari. Only Safari allows saving of a WebApp to the homescreen.
- In Safari, choose Share ▸ Add to Home Screen. The display then opens full screen, like an app.
- The device appears in the device list under the canvas. Select it and switch widgets on.
Everything stays on your local network. The Mac and the device must be on the same network, and no cloud service is used.
Design what each device shows
Each connected device has its own layout. Select it in the device list, then switch widgets on from the sidebar just as you would for a wired display.
The tab works like Wired Displays: widgets on the left, the selected device in the middle, settings on the right.
| Sidebar group | Contents |
|---|---|
| Options | QR Connect, Transport Colours, Idle Display |
| DAW Status / Follow | Border, Transport Status, Counter, SMPTE / MTC, Status Text |
| Audio groups | Meters, loudness, spectrum, waveforms, phase, Tuner, Visualiser and Meter Bridges. See below |
| Utilities | Text Box, Studio Clock, Image, Now Playing, MIDI Piano |
| Controls | Button Panel, Hover Panel |
| Cameras | Camera Feeds and Device Camera (this device sending its own camera). See Cameras |
Quick actions under the canvas: Enable WIFI, Clear All, Remote Settings and QR Connect. The preset menu at the top right saves and recalls remote layouts. Press ⌃F13 to jump straight to this tab.
Laying out a remote
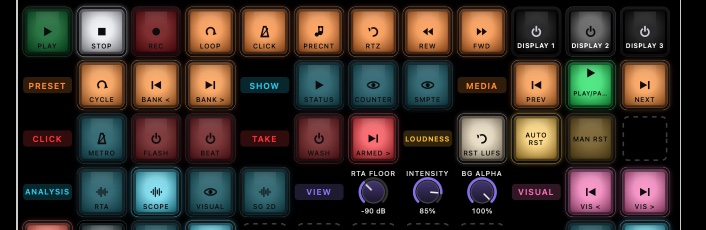
The Remote editor works like the Wired Displays editor, and everything you know there applies — but the device is not in front of you, so a few things are worth spelling out.
- Select the device in the list under the canvas. The canvas becomes a live preview of that device, in its own shape.
- Switch a widget on from the sidebar. Groups fold exactly as they do on wired displays — see The widget sidebar.
- Place it by dragging on the canvas, and size it by dragging a corner. The device follows as you work; there is no “apply” step.
- Configure it on the right. It is the same settings page as the wired version of that widget.
- Save it with the preset menu at the top right, so you can bring this layout back on any Remote.
- Rotate the device and the layout follows. Each Remote keeps its own layout, so a tablet in the booth and a phone at the kit never fight over one design.
- Reconnecting is automatic. If a device sleeps, drops off the Wi-Fi or you close the page, it picks its layout back up when it returns — nothing to re-pair.
- After a DarkStage update, reload the page on each device (or reopen it from the Home Screen) so it picks up new widgets.
What a remote can and cannot do
Remotes run almost the whole widget set. The honest differences:
| Area | Wired display | WiFi Remote |
|---|---|---|
| Meters, loudness, spectrum, waveforms, phase | Yes | Yes — same widgets, same settings |
| BPM Detector, Key Detector | Yes | Yes — analysed on the Mac |
| Tuner, Meter Bridges, Channel Names | Yes | Yes |
| DAW status: Border, Transport Status, Counter, SMPTE, Status Text | Yes | Yes |
| Button Panel, Hover Panel | Yes | Yes — up to two Button Panels |
| Cameras: receiving a feed | Yes | Yes |
| Cameras: sending | This Mac’s camera | The device’s own camera, in Safari only |
| Visualiser backdrop | Every style | 15 styles; Sacred Mirror, Voronoi Dream and Julia Drift are wired-only |
| Idle Display | — | Yes, per device |
| Cutout, Notepad | Yes | No |
| AU Plugin Meters | Yes | No |
| Multiple instances | Up to the widget’s limit | Two, for PPM / VU, Needle VU, the Loudness / Dynamics meters, Camera Feeds and Button Panel |
Audio widgets on a remote
Remotes can show DarkStage's meters and analysers too, drawn live on the device from data the Mac streams over your network.
| Group | Widgets |
|---|---|
| Meters | PPM / VU Meters, Needle VU |
| Loudness / Dynamics | LUFS Meter, Loudness Range, Average Dynamics, Dynamics (PSR) |
| Audio Spectrum | Spectrum RTA, Spectrogram 2D, Spectrogram 3D, Spatial Spectrogram |
| Waveforms | Oscilloscope, Rolling Waveform |
| Phase | Scope, Correlation Meter, Polar Sample, Polar Level |
| Musical | Tuner |
| Visualiser | Visualiser. See below |
| Multichannel Audio | Meter Bridge PPM, Meter Bridge VU, and Channel Names (the same list as your wired displays) |
- Inputs A–D: each stereo widget has an INPUT switch in its settings, just like on a wired display. Meter Bridges use the multichannel device instead.
- More than one meter: PPM / VU Meters, Needle VU, the Loudness / Dynamics meters and Button Panel can each have up to two instances on a Remote, added with the + chip in the Instance row exactly as on a wired display. A newly added instance is selected for you.
- Live, not recorded: the Mac sends the newest values only, so a slow network skips frames rather than falling behind.
- Light on the network: even a 64-channel Meter Bridge needs only a few kilobytes per second.
- One look is held back on remotes: the DarkStage Neon VU faceplate isn't offered there and draws as Classic. Nixie Tube meters draw as real tubes on a current Remote page; a device still showing an old page draws them as Plasma until it reloads.
After updating DarkStage, reload the page on each device (or reopen it from the Home Screen) so it picks up the new widgets.
Spectrogram 3D is the heaviest widget to draw. On an older iPad, choose Spectrogram 2D or Spectrum RTA instead.
Use cases
- Singer's loudness check: an iPad in the booth with a big PPM and LUFS Meter, so the vocalist can see how hard they're hitting the mic.
- Band monitor: a Meter Bridge VU on a tablet at the rehearsal side of the glass.
- Mastering client: a phone on the client's desk showing Correlation and LUFS while they listen.
Visualisers on a remote
These Visualiser styles draw on a Remote: Oil Slick, Golden Bloom, Night Sky, Event Horizon, Chaos Garden, Lumen Veil, Aurora Field, Reaction Bloom, Magnetic Orchid, Tidal Lotus, Firefly Grove, Murmuration, Moiré Cathedral, Impossible Tunnel and Afterimage Garden. Sacred Mirror, Voronoi Dream and Julia Drift are for wired displays only.
BPM and Key on a remote
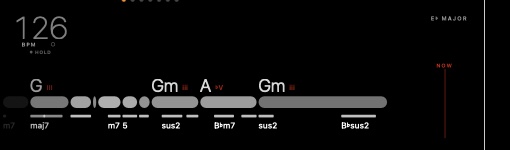
BPM Detector and Key Detector are in the Remote sidebar's MUSICAL group, beside the Tuner. They behave exactly as they do on a wired display: the same views (Key, Chord, Key + Chord, History, Compass and Spectrum), the same Key Code and Accidentals settings, the same HOLD behaviour and the same ↺ reset.
- The Mac does all the listening. It works out the tempo, the key and the chord and sends the finished reading to the Remote, so a Remote never asks for microphone access and never analyses anything itself.
- A Remote therefore shows the same values as a wired display watching the same input, and several Remotes share the one analysis.
- The beat pulse is animated on the device between readings, so it stays smooth without a message per beat.
- Both support more than one instance, each with its own settings.
Not on remotes in this beta
- Cutout and Notepad: wired displays only.
Hover Panel
Not to be confused with Idle Display: the Hover Panel is summoned by you, Idle Display happens when the Remote is left alone. Using the Hover Panel counts as activity and restarts the idle countdown.
A pop-up panel of Button Panel keys that belongs to the Remote itself, not to its layout, so recalling a preset never changes it. Find it under Controls ▸ Hover Panel and turn on Enable Hover Panel. Set Reveal to Tap the Remote (the default) or Assigned Action Only, choose an Auto-Hide time, and load or save Hover Presets. It works the same way as the wired Hover Panel.
Idle Display
When nobody has touched a Remote for a while, Idle Display can dim it or swap it to a different layout — a bright iPad is a distraction in a dark control room, and a tablet on a music stand can show something calmer between takes. Touch it and your working layout is back at once.
Idle Display belongs to WiFi Remotes. Wired displays have no idle dimming of their own: to blank a wired screen use its overlay shortcut or Peek.
Setting it up
- Open the WiFi Remotes tab and select the device in the list under the canvas.
- In the sidebar, open OPTIONS ▸ Idle Display.
- Set Idle Action to Dim or Show Preset. Off is the default and nothing happens.
- Set Idle After — 5 seconds to 60 minutes; 5 minutes is the default.
- For Dim, set Dim To (how dark it goes). For Show Preset, choose the Idle Preset.
- Fade In sets how gently the idle look arrives.
The Now line on the card says what that Remote is doing at this moment, so you can check the setting without walking over to the device.
How it behaves
- Only a person resets the clock. A touch on the device counts — Hover Panel and Setup included. Meters moving, the counter running or a scene arriving do not, so a Remote nobody is using still goes idle while the music plays.
- The first touch only wakes it. That tap is swallowed, so you cannot set something off by accident reaching for a sleeping Remote.
- Waking is instant. The device keeps your working layout in memory and puts it back without asking the Mac.
- Nothing is recalled and nothing is saved. Show Preset lays the chosen preset over the Remote temporarily; your layout, its widgets and its settings are untouched.
- It survives a preset recall. Recalling a layout onto the Remote replaces its widgets but leaves Idle Display as you set it — like the Hover Panel, it belongs to the device, not the layout.
- One thing shows at a time, so an idle Remote costs no extra meter traffic.
Turning it off
Set Idle Action back to Off. There is no global switch — each Remote has its own setting, so the booth iPad can dim while the client’s phone never does. Forgetting a Remote in Remotes Manager forgets its Idle Display setting too.
| You see | Try |
|---|---|
| A Remote never goes idle | Check Idle Action isn’t Off, and that nobody is touching it — any touch restarts the countdown. |
| It goes idle while being watched | Watching isn’t touching. Raise Idle After, or use Dim with a higher Dim To so it stays readable. |
| Show Preset shows the wrong layout | Idle Preset names a display preset; check it still exists in the Preset Manager. |
| The first tap seems to do nothing | Deliberate — it wakes the Remote and nothing else. Tap again. |
Managing remotes
Settings ▸ Remotes Manager lists every Remote that has connected. Forget ones you no longer use, one at a time or several at once, and choose how long inactive Remotes are remembered. Remotes are named from what the device reports; rename one from the Setup panel on the device itself.
Shared Display
The Shared Display row at the top of the device list is one layout that any number of people can watch. Select it and the QR Connect page shows a Broadcast Link, with Watching now, Copy Link and New Join Link. Make a new link to stop old ones working.
Print your WiFi code from Settings ▸ WiFi QR Generator; its Shared Display QR Code shortcut opens the QR Connect page, where you can print the Shared Display code too. Pin both up in the client lounge.
Ideas
Recording light
- An iPad outside the live room door showing a full-screen Transport Status wash: red when recording, dark when stopped.
Players' counter
- An iPad on each music stand with a large Counter in bars:beats.
Talkback-free cues
- Status Text reading STANDBY when armed and GO when recording, for a booth with no headphones.
Remote transport
- A Button Panel with DAW Aware Play, Stop and Record on a phone at the drum kit. DAW Aware buttons don't need the DAW to be in front on the Mac.