Button Panel
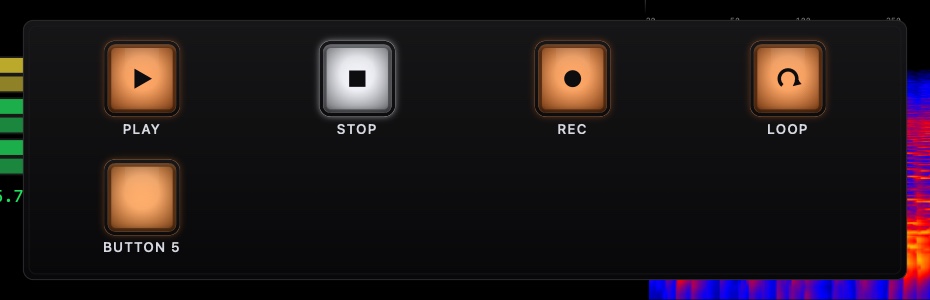
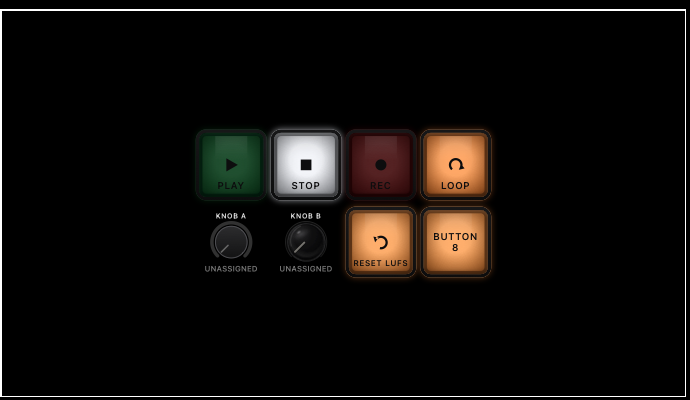
A grid of illuminated buttons on a blacked-out display or a WiFi Remote. Keys can drive your DAW’s transport, fire keyboard shortcuts, type text, run a sequence, send MIDI, or control DarkStage itself — and knobs can drive anything continuous.
What people use it for
- Transport at the kit. Play, Stop and Record on a phone taped to a music stand, so the drummer can punch in without walking back.
- A clean control room. One panel on the blacked-out overlay replaces a cluttered desktop of windows.
- Repeatable jobs. A single key that saves, then bounces, then types the take name.
- Camera switching. One key brings the live-room camera up on the control-room screen.
Button Panels work on wired displays and on WiFi Remotes. The editor, the actions and the layouts are the same on both; a Remote can hold two panels. DAW Aware keys do not need the DAW to be the front application.
Getting started
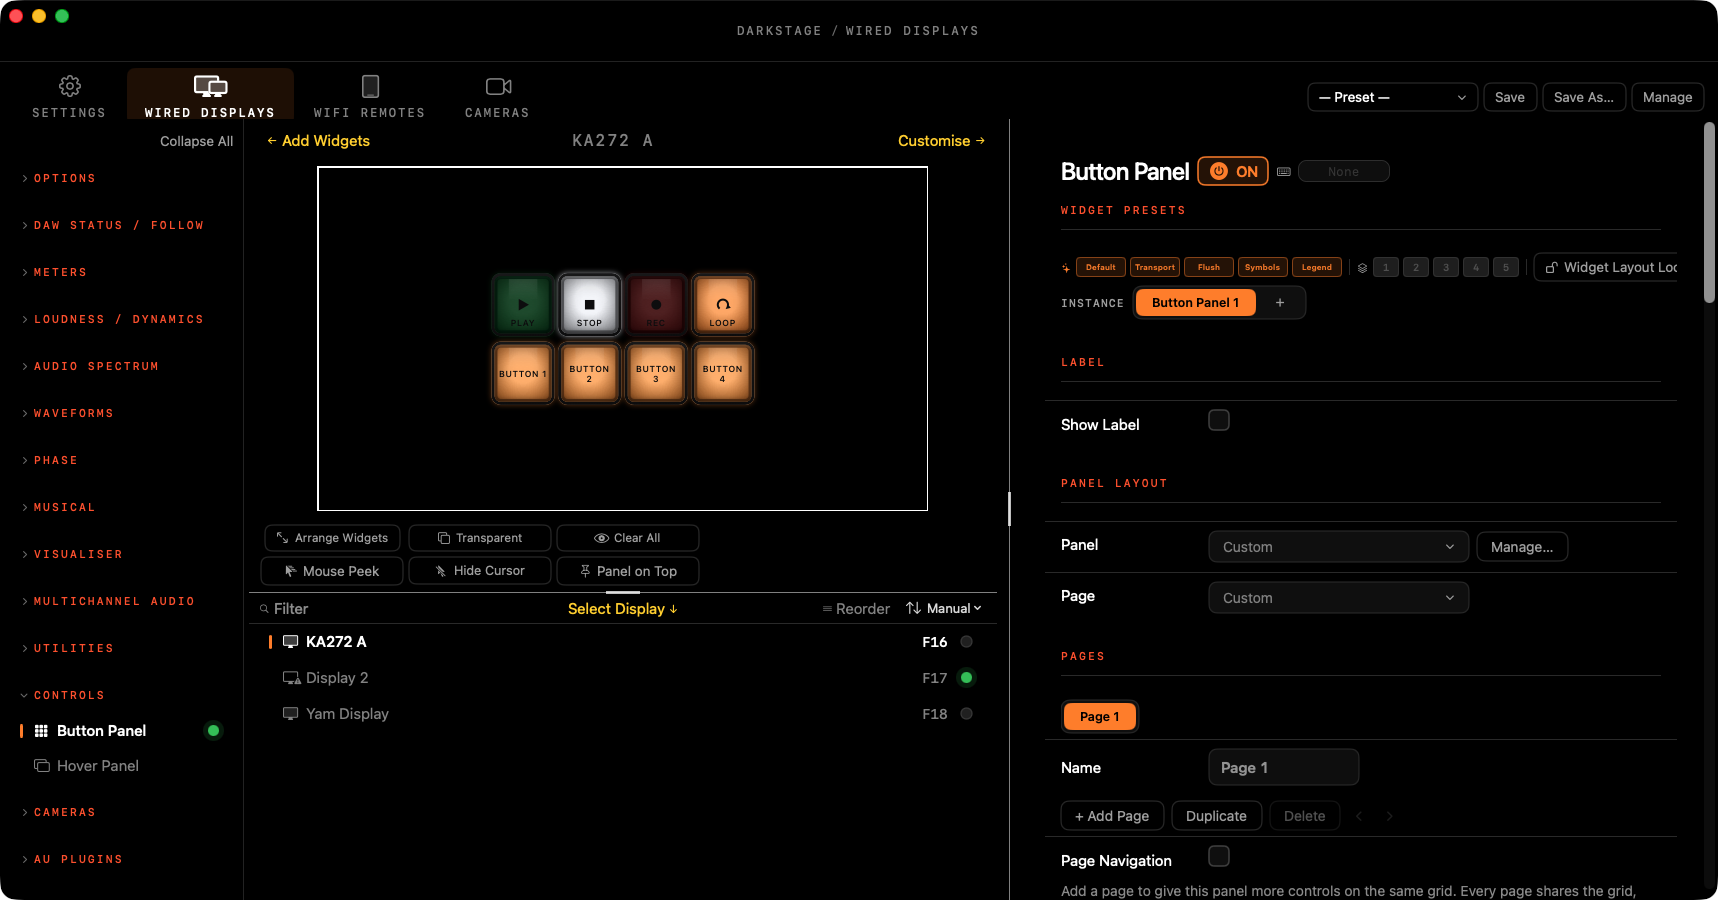
Adding a panel
- In the sidebar, open CONTROLS and switch on Button Panel.
- It appears on the canvas. Drag it where you want it; drag a corner to resize. On a blacked-out display you can drag it directly on the screen, or hold Control first on a transparent one.
- Click the panel to open its settings on the right.
- Under Layout, set Columns and Rows (1–12 each), and tune Button Size and Spacing.
A display can hold more than one Button Panel — add another from the Instance row at the top of its settings — so you can keep transport keys by the meters and a separate strip of DarkStage controls elsewhere. Button Panels also work on WiFi Remotes, with the same editor and the same actions; a Remote can have two.
Position and multiple panels
Set Position remembers where the panel is on this display; Reposition brings it back there (or to the middle if no position is set) if it ends up off screen. A display can have up to two Button Panels, each with its own pages and layout.
Keyboard buttons need Accessibility permission. Without it, buttons still light up but send nothing.
On a blacked-out display, click a button to fire it; Control-drag to move the panel without pressing anything.
A sequence with pauses automates repetitive jobs: Save → wait 500 ms → Bounce → type the file name → Return.
Use cases
- Transport on an iPad: the Transport page on a WiFi Remote at the drum kit, so the drummer can drop in without walking to the Mac.
- Session macros: buttons for Save, New Playlist and Tab to Transient.
- One key, new look: a key that recalls a PPM's Quick Preset when you switch from tracking to mixing.
Buttons: look and behaviour
Select a cell on the canvas (or a row in the Button List) and the settings on the right apply to it.
Appearance
- Name and Label Position — the text and where it sits.
- Symbol and Symbol Size — an icon instead of, or beside, the text.
- Colour — the key’s own colour.
- Font Size, Show Labels and Show Text — readability from across the room.
- Glow Intensity, Flash Brightness and Button Idle / Off Dim — how bright lit, flashing and unlit keys are. Turn the idle dim down in a dark room.
- Panel-wide: Button Size, Spacing, Background, Background Alpha, Border and Border Thickness.
Illumination
Illumination decides when a key lights:
- On — lit all the time. The default for a new button.
- Momentary — lit only while pressed. Right for talkback or any held action.
- Off — never lights.
A DAW Aware key is different: its lamp follows the DAW’s real state, so Play stays lit while the session rolls. That is the DAW reporting back, not the key remembering it was pressed.
What a key can do
Select a button and choose its Action (Keyboard, DarkStage, MIDI or Focus App). DAW keys are added separately, from DAW Aware Buttons:
| Action | Does | Needs the app in front? |
|---|---|---|
| DAW Aware (Add DAW Button… ▾) | A DAW command (Play, Stop, Record, Loop, Rewind, Return to Zero…) that follows whichever DAW is chosen in DAW Sync. The lamp lights from the DAW's real state. | No. The command goes straight to the DAW |
| Keyboard | Your own keyboard shortcut, typed text, or a sequence of both | Usually. See Target Application |
| DarkStage | A DarkStage control or action: switch a widget, recall a preset, change a setting, turn a page, open a display editor | No |
| Focus App | Brings a chosen application to the front | No |
| MIDI | Sends a MIDI Note, CC, Program Change, Pitch Bend or Channel Pressure message, for example to DarkStage MIDI Bus (your DAW's DarkStage MIDI input) | No |
DAW Aware buttons use each DAW's factory commands. If you've customised your DAW's key commands, DarkStage can't see that, so use Keyboard buttons for custom commands.
Assigning actions
Add DAW buttons
- Choose your DAW in Settings ▸ DAW Sync.
- Under DAW Aware Buttons, click Add DAW Button… ▾ and pick commands from the list. Or start from the factory Transport page layout.
- Optionally add an After DAW Action step, such as a shortcut that runs after the command.
Add a shortcut or text button
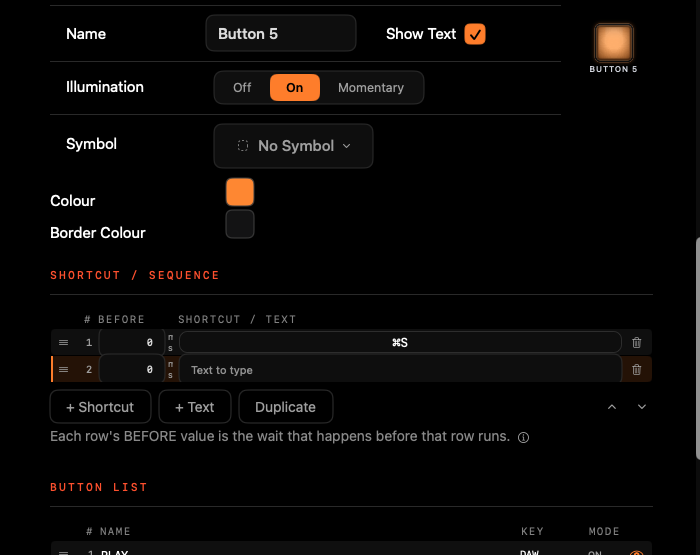
- Click + Add Button. It appears in the Button List and opens for editing.
- Give it a Name, a Symbol and a Colour, and choose Illumination: Momentary lights while pressed, On stays lit all the time (the default for a new button), Off never lights.
- Under Shortcut / Sequence, click the shortcut field (it shows Press keys…) and press the key combination, for example ⌘S.
- Add more steps with + Shortcut or + Text. Each row's BEFORE value is a pause in milliseconds before that step runs.
A sequence is made of shortcut and text steps only. Text is typed into the front application.
Target Application
A Keyboard button can aim its shortcut at one application, set under Target Application ▸ Delivery:
- Normal: the keys go to whichever app is in front.
- Background: the keys go straight to the chosen app while it stays in the background, so your DAW keeps focus.
- Focus First: brings the app to the front, then sends. If it doesn't come forward within a second, nothing is sent.
A Focus App button just brings its Application to the front. In every case, if the app isn't running nothing happens; DarkStage never launches it.
Assign DarkStage controls to a key
A DarkStage key (or knob) can drive almost anything in DarkStage: switch a widget or a group on and off, change a setting, recall a preset, or move between pages.
- Enter Assign mode: click Assign by Clicking… in the key's settings, or press and hold the key on the canvas, or hold it for 3 seconds on the live display or a Remote. On the canvas you can also right-click and choose Assign DarkStage Control…. An ASSIGN banner appears.
- Click the control you want in DarkStage's settings. Controls you can assign are highlighted.
- Press Esc or Cancel to stop without assigning.
The Open Display Editor action opens the DarkStage window with a chosen wired display or Remote selected, ready to edit.
Recall a widget's Quick Preset from a key
A key can recall one widget's Factory or User Quick Preset, the looks stored in that widget's preset bar. It's a button action, aimed at one exact widget instance, so on a display with two PPM meters the key changes only the one you chose.
Where the presets are
Every widget that has them shows a WIDGET PRESETS row at the top of its settings page, and that row is where assignment happens.
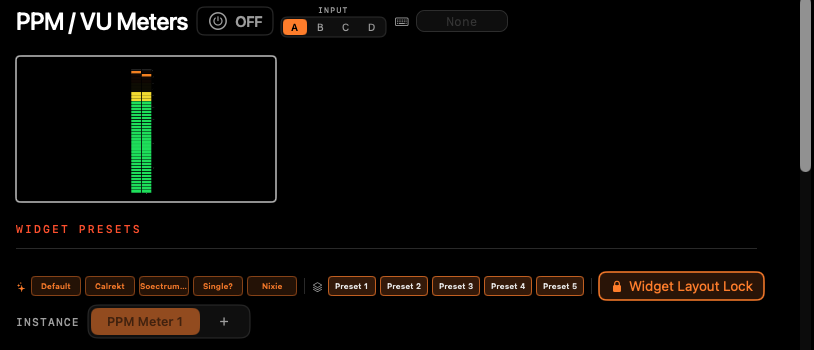
- Factory presets are the chips to the left of the divider. They are built in and cannot be overwritten. Each widget has its own set, with its own names — the PPM names above are that widget's, and they are not the names you will see on a Needle VU or a Spectrum. Names may also change between releases, so go by the position in the bar, not by a name you read here.
- User slots are the five chips to the right of the divider. These are yours to save a look into and recall later.
- Widget Layout Lock, at the end of the row, keeps a recalled preset from moving or resizing the widget — so a preset changes the look without disturbing your layout.
Assigning one to a key
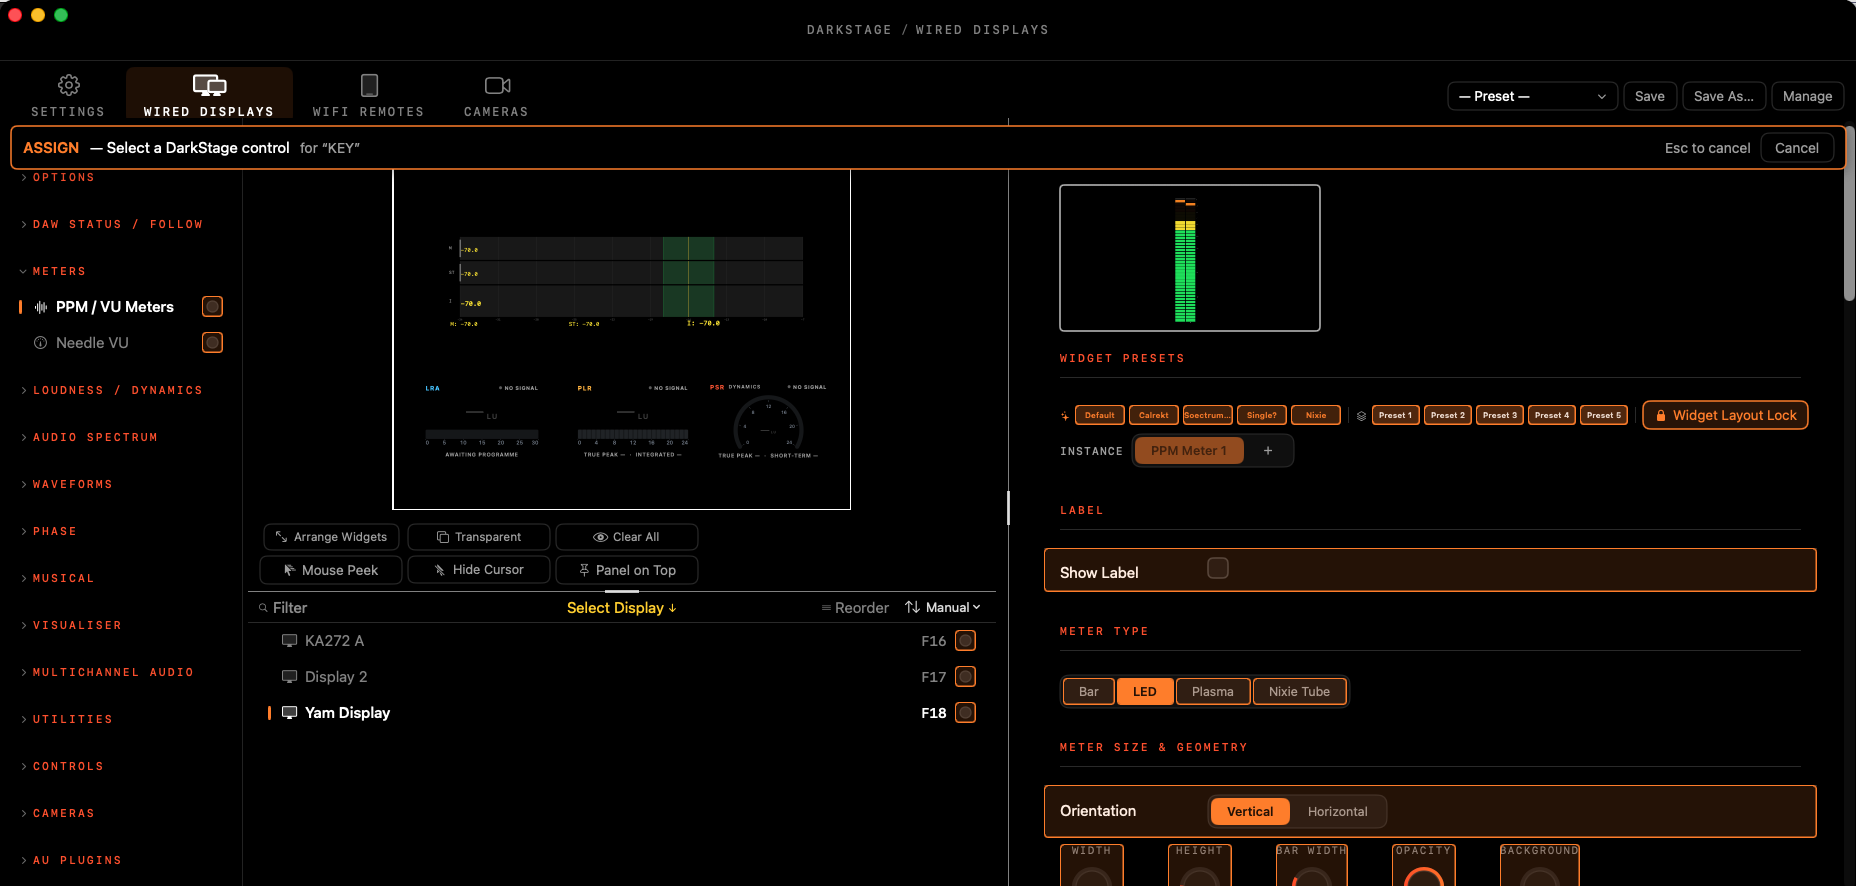
- Hold the key to enter Assign mode (or click Assign by Clicking…). An ASSIGN — Select a DarkStage control banner appears across the Settings window, naming the key it is waiting for. It stays until you choose something, press Esc or click Cancel.
- With the banner up, select the target widget — and the right instance — so its settings page is showing. The banner follows you from page to page, and every control the key could take is outlined, so you can see at a glance what is assignable.
- Click the preset chip you want in that widget's WIDGET PRESETS row. The banner confirms the assignment and the key takes the preset's name.
- To use it, just press the key: that widget instance snaps to that look.
To change it later, pick another entry in the key's On Press row (listed as Factory · name or User · name). If the preset is cleared, the key does nothing until you choose another. Button Panel, Studio Clock, Image and Meter Bridge VU have no Quick Presets a key can target.
This recalls a single widget's look. Recalling a full overlay preset is a different DarkStage action, and it replaces the whole display, which can include this Button Panel.
MIDI keys
A MIDI key sends a message to your DAW through DarkStage MIDI Bus, which your DAW sees as an input called DarkStage MIDI. Choose the Message — Note, Controller (CC), Program, Pitch Bend or Pressure — then its Channel and value: Note and Velocity for a note, Controller with Set Value / Off Value for a CC, Program for a program change. A knob can send a continuously varying CC the same way.
Factory MIDI layouts are provided: the full panel MIDI Performance, and the pages MIDI — Piano, MIDI — Drum Pads, MIDI — Controls and MIDI — Piano Strip.
Sequences
A key can run several steps in order. Build one under Shortcut / Sequence:
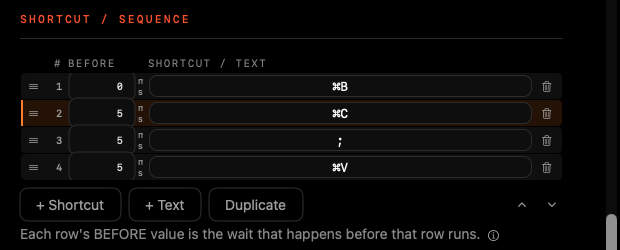
- Click the shortcut field and press the first key combination.
- Add more steps with + Shortcut or + Text. Text is typed into the front application — useful for a take name or a marker comment.
- Give a step a BEFORE value to pause, in milliseconds, before it runs. This is what makes a save finish before the next keystroke arrives.
- Set Target Application ▸ Delivery if the steps must reach one particular app.
A sequence is made of shortcut and text steps only — you cannot nest a DAW Aware command inside one. To test it, press the key on the canvas and watch the target app; if only the first step lands, the app most likely needed longer, so raise the BEFORE value on the step that failed.
Pages
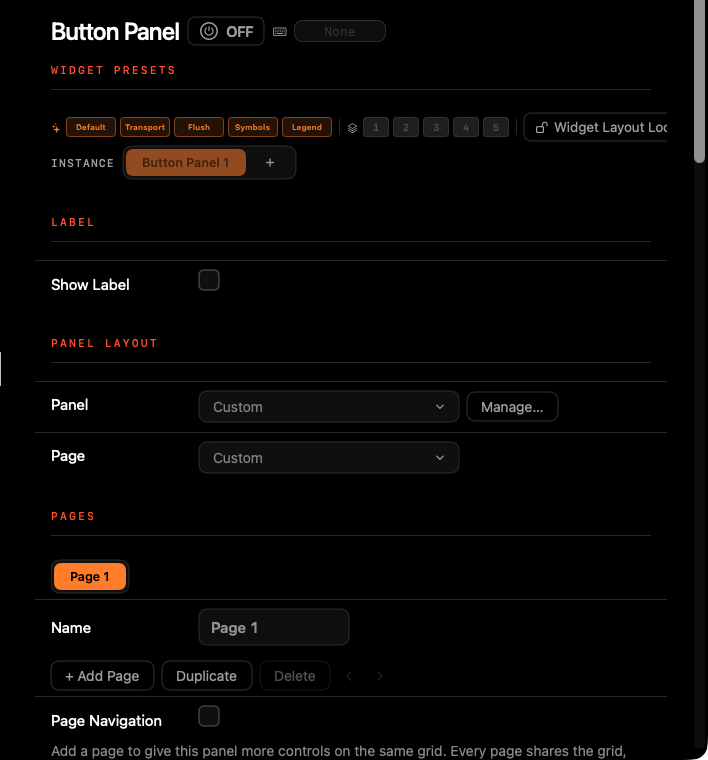
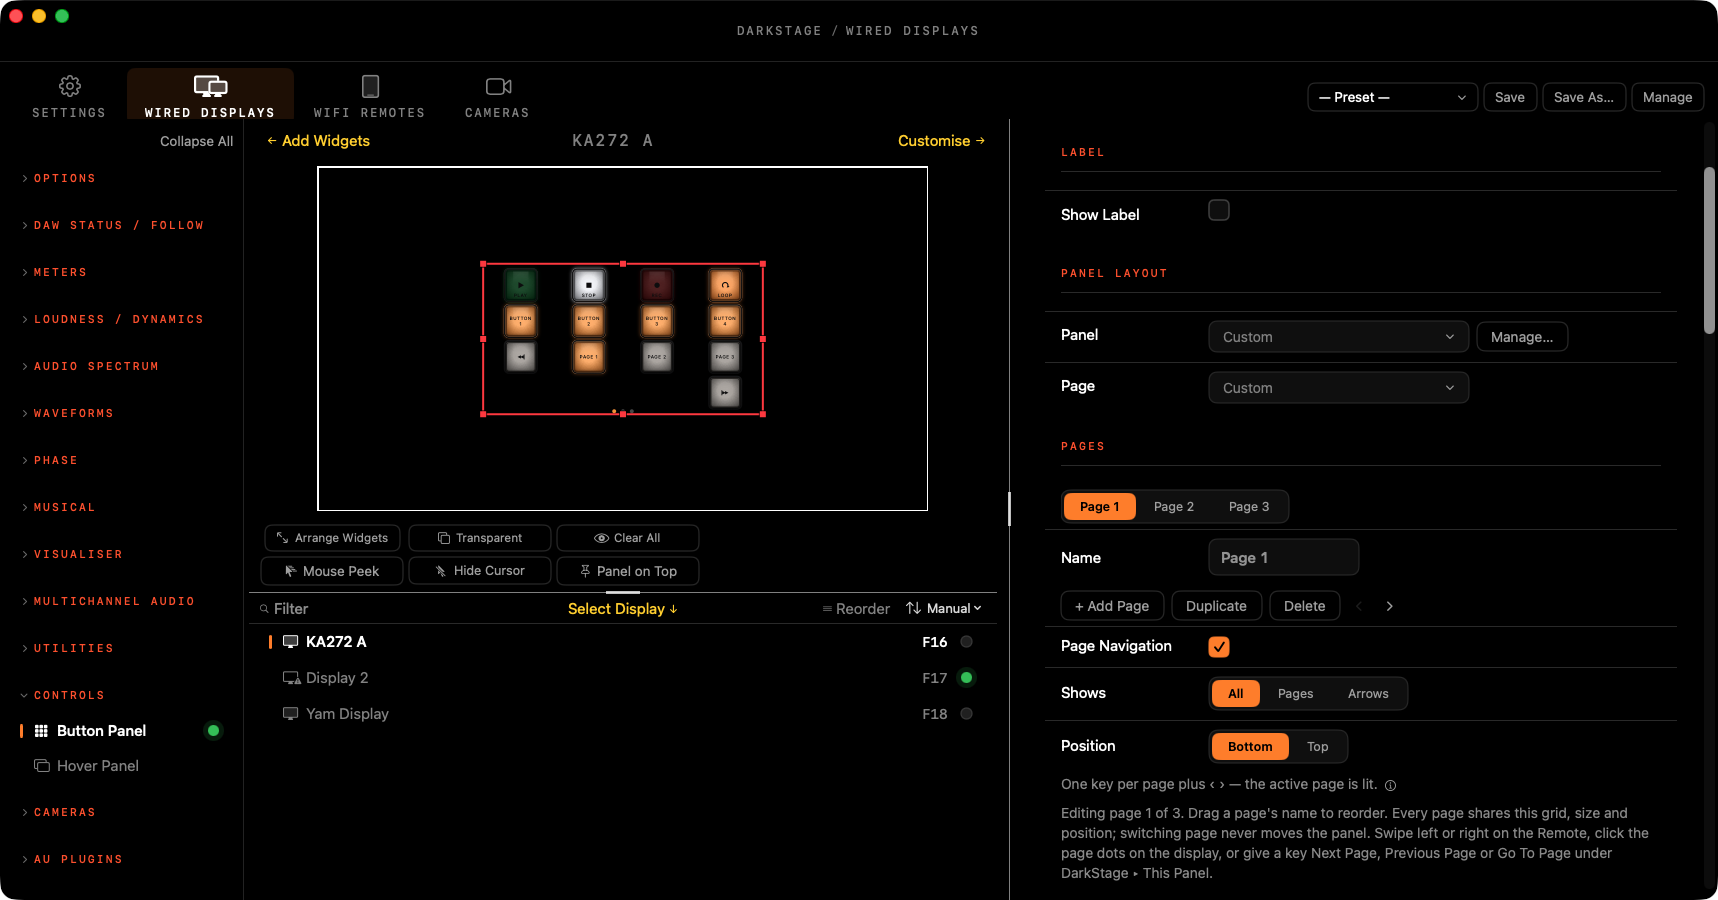
A panel can hold up to 16 Pages of controls. In the Pages section use + Add Page, Duplicate and Delete, type a Name, and drag a page's name to reorder it.
- Flexible pages: each page has its own grid. Set its Columns and Rows (1–12 each) under Layout; with more than one page, a Page Grid — <page name> caption shows which page you're sizing. The panel's size and position are shared by every page.
- Empty and Spacer cells: an Empty cell holds a place and shows nothing; a Spacer is an inert divider that can show a coloured bar and a short name. Neither can be pressed. Choose them from Make.
- Changing page: Page Navigation adds page keys and ‹ › arrows to the panel. Click the page dots on the display, swipe left or right on the panel, or give a key Next Page, Previous Page or Go To Page.
Knobs
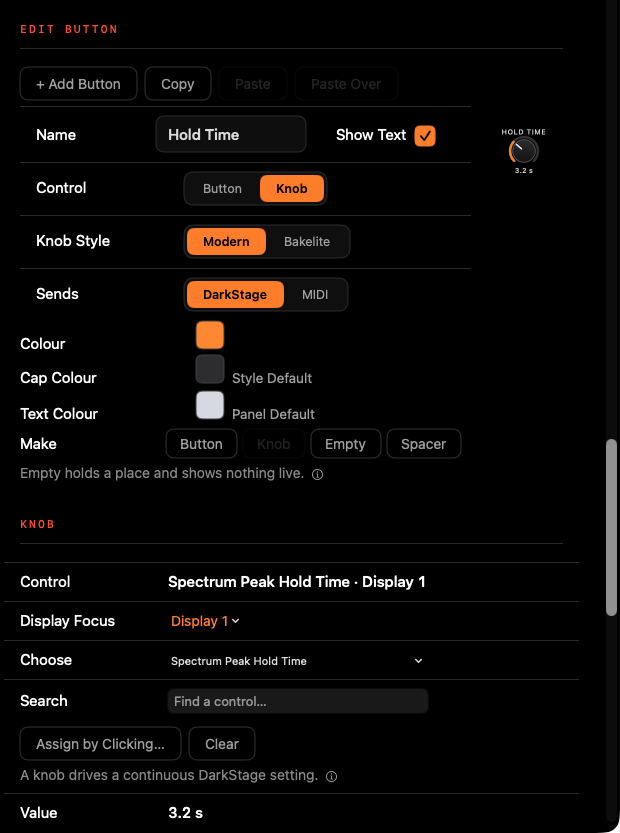
Any cell can be a Knob instead of a button: select it and choose Make ▸ Knob. A knob drives a continuous DarkStage setting — a level, a size, an opacity, a meter's range — rather than firing an action. Drag up or down to adjust it; hold ⌥ for fine control. Knob Style is Modern or Bakelite.
Assign one exactly as you would a key: click Assign by Clicking…, then click the control you want it to drive. Not every control is continuous — only the ones that highlight can be taken. Display Focus decides which display the knob acts on, so the same panel can drive a different screen's setting.
Layouts and presets
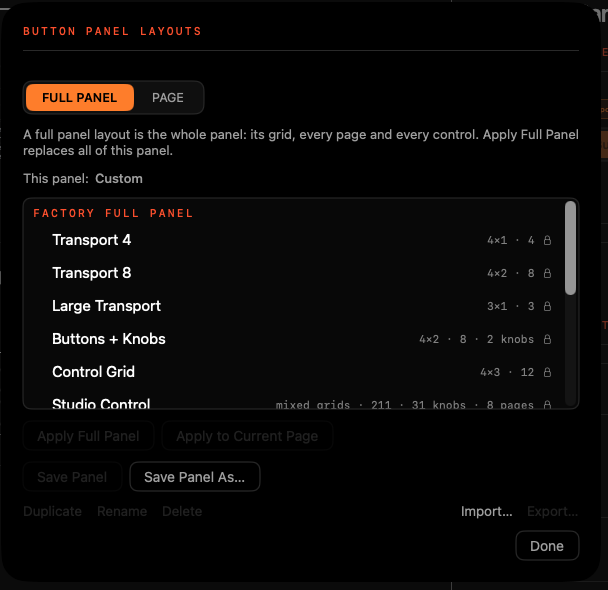
The Panel Layout section has a Panel row and a Page row for saving and recalling layouts:
- Full panel: Apply Full Panel replaces all pages. Factory full-panel layouts include Studio Control, Studio Control XL, PPM Control, Spectrum Control and Visualiser Control. Save your own with Save Panel / Save Panel As….
- Page: Apply to Current Page replaces just the page you're on, including its grid. Factory pages include Transport, Record, Listen, Meters, Display and more. Save with Save Page / Save Page As….
- Layout Manager (headed Button Panel Layouts): open it with Manage… or Manage Page Layouts… to Rename, Duplicate, Delete, Export… or Import… your layouts. Factory layouts are read-only: duplicate one or use Save As to make your own.
MIDI factory layouts: the full panel MIDI Performance, and the pages MIDI — Piano, MIDI — Drum Pads, MIDI — Controls and MIDI — Piano Strip. Their keys and knobs send MIDI through DarkStage MIDI Bus, which your DAW sees as DarkStage MIDI.
Editing several at once
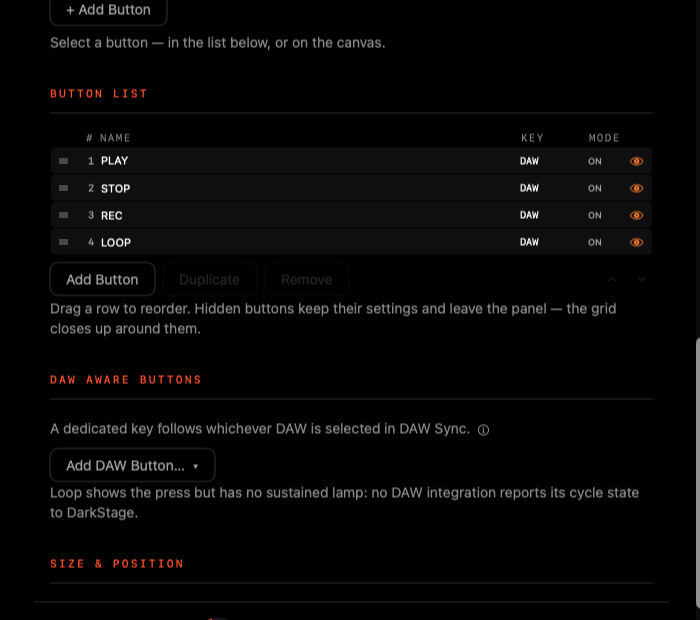
- Select several: ⌘-click to add or remove a cell, ⇧-click for a range. The settings then edit the whole selection; values that differ show Mixed.
- Copy and paste: right-click on the canvas for Copy, Paste/Insert (adds the copied keys) and Paste/Replace, or use Paste Over to write onto the selected cells. Duplicate, Hide and Delete are there too.
- Undo and Redo from the Edit menu. They name the change they will undo.
- Button List: drag a row's ≡ handle to reorder, click the eye to hide a button (it keeps its settings), and use Duplicate or Remove.
- Layout: Button Size and Spacing. Appearance: background, Glow Intensity, labels and symbol size.
DAW integration
DAW Aware keys follow whichever DAW is chosen in Settings ▸ DAW Sync — Pro Tools, Logic Pro, Cubase, Ableton Live, FL Studio or REAPER — and speak that DAW’s own control-surface language. The command goes straight to the DAW, so it works whether or not the DAW is in front, and the lamp lights from the DAW’s reported state.
- They use factory commands. If you have remapped a command in your DAW, DarkStage cannot see that — make a Keyboard key with your own shortcut instead.
- Change DAW and the keys follow. Switching the DAW in DAW Sync re-points every DAW Aware key, so one panel serves more than one studio.
- Keyboard keys are different. They are keystrokes, so they depend on Target Application and on the app actually running.
See the DAW Setup guides to get your DAW talking to DarkStage in the first place.
Camera keys
Camera controls are ordinary DarkStage assignments: hold the key to enter Assign mode and click the control you want. Useful targets are the Camera Feeds switch on a display and an individual feed’s Location, so one key can bring the live-room camera up on the control-room screen and another can clear it.
Tutorials
1. A transport panel. The quickest route is the factory layout:
- Choose your DAW in Settings ▸ DAW Sync — DAW Aware keys follow whichever DAW is selected there.
- In the panel’s Panel Layout section, open the Page row and Apply to Current Page ▸ Transport.
- Press Play in your DAW. The lamps light from the DAW’s own state, so Play stays lit while it rolls — that is the lamp reporting back, not the key remembering it was pressed.
To build it by hand instead: under DAW Aware Buttons, Add DAW Button… ▾ and choose Play, then Stop, then Record. Nothing else is needed — DAW Aware keys do not require the DAW to be the front application.
2. A momentary key. Momentary means the lamp lights only while your finger is down, which suits talkback or any held action:
- + Add Button, then give it a Name and a Symbol.
- Set Illumination to Momentary. (On stays lit — the default; Off never lights.)
- Give it its action, and set Glow Intensity under Appearance if the lit state is too bright for a dark room.
3. A multi-step sequence. Say you want “save, then bounce” in one key:
- + Add Button, name it Save & Bounce.
- Under Shortcut / Sequence, click the shortcut field and press ⌘S.
- Click + Shortcut and press the bounce command.
- Give the second row a BEFORE value — say 500 ms — so the save finishes before the next keystroke arrives.
- If the keys must reach your DAW while DarkStage keeps focus, set Target Application ▸ Delivery to Background and choose the DAW.
Sequences are shortcut and text steps only. Use + Text to type a take name or a marker comment into the front application.
4. Pages and a knob. A panel can hold 16 pages, each with its own grid:
- In Pages, + Add Page and name it, say, Meters.
- Set that page’s Columns and Rows — the caption tells you which page you are sizing. The panel’s size and position are shared by every page.
- Turn on Page Navigation so the panel carries page keys and ‹ › arrows, or assign a key Next Page.
- Select a cell and choose Make ▸ Knob, then Assign by Clicking… and click a continuous control — a size or a level. Drag the knob up and down to adjust, holding ⌥ for fine control.
5. A camera control panel. Two keys that bring a camera up and clear it again:
- Set the cameras up first — see Cameras — so the Locations you want exist.
- On the display that should show them, switch on Camera Feeds and set its Location.
- Add a Button Panel key, hold it to enter Assign mode, and click that display’s Camera Feeds switch. The key now shows and hides the feed.
- Add a second key for another display or another feed instance, so one panel runs the whole room.
Give the two keys different colours and symbols — a camera glyph lit green for live is readable at a glance from the other side of the glass.
Troubleshooting
| You see | Try |
|---|---|
| A Keyboard key does nothing | The target app may not be running — DarkStage never launches it. Check Target Application ▸ Delivery: Normal sends to whatever is in front, which may not be your DAW. |
| A DAW Aware key does nothing | Check the DAW chosen in Settings ▸ DAW Sync matches the DAW you are using, and that DAW Sync shows connected in the menu bar. |
| A DAW command works in the DAW but not from the key | DAW Aware keys use each DAW’s factory commands. If you have remapped that command, make a Keyboard key with your own shortcut instead. |
| The lamp never lights | Illumination may be Off, or Glow Intensity very low. DAW Aware lamps also need the DAW to be reporting state. |
| Assign mode won’t catch a control | Only highlighted controls can be assigned. Press Esc to leave Assign mode and try the control’s own settings page. |
| A Quick Preset key stopped working | It targets one widget instance. If that widget or preset was removed, pick another entry in the key’s On Press row. |